sexta-feira, 24 de outubro de 2008

strawberry / morango

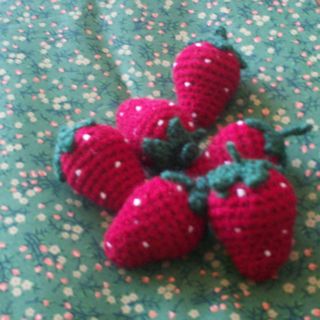
(horrible, horrible photo!)

I did a quick seach for strawberries patterns before posting mine here. I thought i would find dozens,but i didn't... so i guess it's ok to post one more ;)
The links to the ones i 've found are below , plus a link for super yummy strawberries to sew.

* Please note that i am using yarns of 2 different weights in this pattern, and i am in Brasil so i cannot help you with yarn suggestions. If you don't have the yarn required for the leaves, you could try this :
ch 2, *slip stitch on second chain from hook, ch3, dc, ch2, slip stitch" 5 times, leave yarn to sew to the strawberry and use it to make a loop on the center (if you plan to hang your strawberry ) or just pull the yarn through the middle after sewing to create a stem. :) i didn't try it myself, so let me know if it works ;)


life size strawberries

materials:
3.00mm hook for the strawberry
2.00mm hook for leaves
tapestry needle
green and red scrap yarns

t
erms and abbreviations:
scT : scs worked on the same stitch)
scD : decrease
* * : repeat

instructions:
using red yarn
1)6sc
2)*2sct, sc next 2 sc* ( 9 st)
3)*2sct, sc next 3 sc* (12 st)
4) sc around ( 12 st)
5) *2sct, 3 sc* ( 15 st)
6) sc around
7) *2sct, 4 sc* (18 st)
8) *2sct, 2 sc* ( 24 st)
9) sc around
10) *scD, 6 sc* (21 st)
11) sc
12) *scD, 1 sc* (14 st)
13) scD around
sew hole closed

leaves and stem
1) 5 sc
2) 2 scT each sc ( 10 st)
3) in one sc make *slip stitch , 1hdc, Dc, picot* and on the next sc : *Dc, hdc, slip stitch* repeat it for the next 4 pairs of sc
f.O, leave yarn to sew
while sewing, pull the yarn through the middle of the leaves, make a loop to create a little handle. hold it and continue sewing . you can finish the handle with buttonhole stitch, so it looks cuter and more durable.
or you can make a simple stem, just by pulling the yarn through the middle of the leaves after sewing them to the strawberry


phew! it was much more complicated to write the instructions for the stem in english than to make a basket of strawberries! hope it's clear, if not , feel free to email me

And now, the links for the strawberries i found

strawberries with chocolate! at Naida's crochet

a knitted strawberry at pezdiva's flickr page

felt strawberries at mr. monkeysuit ( there's also a tutorial for green peas)


edit 14/09 adding 2 links (just because I think a lil' basket full of strawberries crocheted from different patterns will look really cool):

a japanese pattern at rakuten.co.jp here's the direct link for pdf

easy peasy strawberries by Melissa Mall ( via ravelry)


edit 4/1/10
found another cute felt stawbery and just had to share: from " Shishigirl

quarta-feira, 8 de outubro de 2008

links

I've been quite busy these days, so i thought i should share a few links for other designers free patterns that i am sure you'll enjoy:)
Meanwhile,if you want to know what i've been doing, check my amigurumi set on flickr, there's a ninja bunny and a devilish Lola will show off soon :)

Ando super ocupada, sem tempo para o blog, então estou postando alguns links pra patterns que foram postados recentemente ( ou não :)


clover, pdf ami patterns ( porquinho, cogumelo, coelho...)

Zoe Lily-Belle, Amigurumi Girl's super cute doll

a cute alien could be a good friend to your Beet

for halloween, the coolest pumpin i've seen, and a ghost ,by Flesh Eating Bunny

and a fuzzy Spider! By Christine, Enami Eyes


have fun!
Divirtam-se :)

sexta-feira, 26 de setembro de 2008

monster or vegetable? Beet, the ami monster

*scroll down for english version

Monstrinho ou vegetal?

Este é Beet, o resultado de algumas modificações que fiz nessa receita de monstrinho do Craftbits.
a receita já com as modificações


Cabelinhos
12 correntinhas, 11 pb; 8 correntinhas, 7pb; 14 corr, 13 pb
juntar a 'base' para costurar na cabeça/corpo

Olho
(preto)
1) 6 pb
2) 12 pb ( 6 aumentos)
3) mudar para segunda cor, *2pb juntos, 1 pb*
4) *2pb juntos, 2pb*
5) mudar para o branco, pb toda a carreira
deixe linha pra costurar

Corpo-cabeça ( original)
1) 6pb
2) 12 pb (6 aumentos)
3) *2pbj, 1pb* (18)
4) *2pbj, 2pb* (24)
5) *2pbj, 3pb* (30)
6-8) pb
9) *2pbj, 4pb* (36)
10-12) pb
13) *2pbj, 5pb* (42)
14) *2pbj, 6pb* (48)
15-18) pb
19) *1 redução, 6 pb* (42)
20) *1 red, 5pb* (36)
21) *1 red, 4pb* (30)
22) *1 red, 3pb* (24)
23) *1 red, 2pb* (18)
-- encher a cabeça--
24) *1 red, 1pb* (12)
25) reduzir até fechar

Pés ( x2)
fazer 3 dedos:
1) 5pb
2) 10pb
3) 10pb
juntar os 3 dedos em fila, como no coração ( pode ser feito com pt bxmo, usando a sobrinha de linha) sem cortar a linha do terceiro dedo
4) pb (22)
5) *3pb, 1 red* 3 pb
6-7) pb
8) *4pb, 1 red*
9) *3 pb, 1 red*
10) reduzir até fechar . costure o "peito do pé' ao corpo

Beet, the ami monster
my version for Craftbits' pattern, not so scary monster.

terms and abbreviations:
scT : scs worked on the same stitch)
scD : decrease
* * : repeat

Hair
ch 12,
turn, sc on 3rd ch from hook,10 sc; ch 8, turn, sc on 3rd ch from hook, 6sc; ch14, turn, sc on 3rd ch from hook, 12 sc. join the bottom to sew to the body/head

Eye

1) (black)6 sc
2) 12 sc

3) change to the second color, *2scT, 1sc*

4) *2scT, 2sc*
5) change color- white, sc along leave yarn to sew

Head/Body( original)

1) 6sc

2) 12sc

3) *2scT, 1sc* (18)

4) *2scT, 2sc* (24)

5) *2scT, 3sc* (30)

6-8) sc
9) *2scT, 4sc* (36)
10-12) sc

13) *2scT, 5sc* (42)

14) *2scT, 6sc* (48)

15-18) sc
19) *1 scD, 6 sc* (42)
20) *1 scD, 5sc* (36)

21) *1 scD, 4sc* (30)

22) *1 scD, 3sc* (24)

23) *1 scD, 2sc* (18)
-- stuff --
24) *1 scD, 1sc* (12)
25) decrease until closed

Feet ( x2)

make 3 fingers:

1) 5sc

2) 10sc

3) 10sc

Do not finish off 3rd finger
join the 3 fingers in a row as show here ( can be done with slip stitches, using the tail left from each finger)
4) sc (22)
5) *3sc, 1 scD* 1sc each last 3 sc

6-7) sc

8) *4sc, 1 scD*

9) *3sc, 1 scD*

10) decrease until closed .

Sew the "top" of the feet to the bottom of the body.

edited for correction on round 5 (head/ body).
Thanks Cynthia! :)

quinta-feira, 18 de setembro de 2008

criaturas de tricô

Eles são todos de tricô! Desde que eu fiz esse blog que eu quero postar as criaturas incríveis feitas pela Knittycat.
Mas eu não conseguia escolher quais fotos colocar, nem desenvolver um texto à altura... melhor dividir com vocês no improviso que nada :)
A primeira vez que ví "o Coisa" foi em um grupo do flickr (free knit and crochet patterns),
e nem cliquei, porque achei que a foto estivesse alí por engano! O Coisa, simplesmente não era possível... e com receita ainda? Não. Alguém colocou a foto de um brinquedo industrializado no grupo...
Acabei tendo a sorte de ver as outras criaturas e descobrir que a autora além de ultra talentosa é um amor, doce de pessoa e ainda por cima divide com a gente as receitas!
Eu não faço tricô ainda, só o básico do básico: sou capaz de fazer biquini e cachecol e só. Estou aprendendo pra fazer casaquinhos pro bebê de uma amiga, e quem sabe, daqui a uns 10 anos eu consiga fazer o Coisa e com sorte e algum esforço, antes faço o caco pro próximo filho da minha amiga.

vamos aos links!
knittycat no flickr
o site
as receitas ( em inglês)
e ainda tem muitas criaturinhas fofas, como uma ovelhinha, uma hipopótama... até o tomate dela é cute!

um bom mini dicionário para os termos em inglês de tricô, no tricoxtrico

quinta-feira, 11 de setembro de 2008

O Punk


Don't let his style fool you.
He is just a nice guy that dyes his hair with food coloring, make his own t-shirts, believes that all human is born with pure soul that is corrupted by the enviroment/system, and that we need no government of any kind, just the sense of community and mutual aid.


quarta-feira, 3 de setembro de 2008

amigurumi heart/ coração pequeno

free pattern for a tiny heart

finished size:
0.78 inches using a 1.25 hook
1.3 inches using a 3.00 mm hook

terms and abbreviations:
scT : scs worked on the same stitch)
scD : decrease

top halves (make 2)
1) magic ring, 6 sc
2) 2 scT each sc around
3-4) sc ( 12 sts)
dont finish off the second half
sew both toguether as shown in the picture
put working loop back on the hook
5-6) sc around ( 20 sts)
7) 2 scD, evenly spaced ( 18 sts)
8-9) 4 scD, evenly spaced (10 sts on 9th round)-- add stuffing
10) 2scD evenly spaced
11) scD until closed


receita dos corações, espero que gostem

tamanhos:
2 cm com agulha nº 3
3,5 cm com agulha de 3.00 mm

"metades de cima" (2X)
1) 6 pbx
2) 12 pbx
3-4) 12 pbx
não corte a linha da segunda 'metade'
costure as duas como mostrado na foto ( 2 pts de cada metade)
5-6) pbx até completar a carreira ( 20 pts)
7) reduzir 2 pontos
8) reduzir 4 pontos --encher
9) reduzir 2 pontos
10) reduzir até fechar


(edit) february/ fevereiro 2011
adding links to other heart patterns
Mia Zamora's corazoncitos

Roxycrafts'(they look just like candy!)

Weich Taube's at flickr

domingo, 31 de agosto de 2008

mais uma bonequinha / new dolly


fiz pra presentear alguém.
Eu queria uma bonequinha menos girlie de calça jeans, sem florzinhas nem frufrus. No meio do caminho achei que fosse dar tudo errado, coloquei umas listras cor de rosa na blusa e continuava parecendo um menino.
E ainda tinha um gorro, que eu fiz antes da boneca e que serviu de ponto de partida... acabou dando certo.
Já me empolguei e estou testando a receita fazendo um menino;)

Outras bonequinhas que fiz estão no flickr


This is a doll I made to give as a present.
My intention was to make it
much smaller and less girlie than the ones I usually do, and for a while I thought it would backfire an look too boyish. Thanks to the braids, it didn't:) i started from the hat ( makes no sense, I know). I am now working on a boy:) Some of my other dollies on flickr.

quarta-feira, 27 de agosto de 2008

coisas de pano

não são lindos? e oque é melhor, todos tem tutoriais!

pássaros, com tut em pdf da Spool

o Hot Diggity Dog da Q.D. Patooties que ainda tem tuts de um monstrinho, um coelho e mais umas criaturinhas pra fazer com meias! O monstro, que na verdade é um gato de rua mutante, e o cachorro são meus favoritos.

a macaquinha Molly, com tut no blog de mmmcrafts ou pra baixar, em pdf.

e os sapinhos da the purl bee que também tem um tut pra bolinhas de retalhos e vários outros pra costura, patch.. crochê...
os sapinhos têem até um grupo no flickr
Só que ela sugere lentilhas como enchimento, aqui no calor úmido da terrinha tupi... acho mais seguro usar miçangas ou pedrinhas de aquário, ou umas pedrinhas chinesas vendidas em 'lojas de bagulhada made in china'

terça-feira, 19 de agosto de 2008

receitinha dos coelhos em português!

daqui pra frente vou tentar postar as recitas em português também.

Nunca consegui seguir muito bem as receitas de crochê em português, só com gráficos, porque aquele monte de abreviações... cada publicação tem a sua maneira de abreviar. Ou a maneira que são escritas, como em um texto... Não sei. Me complico, me irrito, rosno e jogo tudo pro alto!

As vezes tenho a impressão de que são feitas assim justamente pra que mortais comuns não consigam cumprir a tarefa.
Uma espécie de "código para iniciados"
Acabei criando meu próprio "código" e anoto as receitas numa mistura das duas línguas ;)

enfim, aí estão os coelhinhos, são super fáceis de fazer!

divirtam-se :)


Mr/ms, chubby bunny
: receita em português :)

material:
usei agulha 1.75 mm mas ele pode ser feito com agulha e linhas mais grossas.
duas cores de linha ( na receita como "A"- primeira cor e "B"- segunda cor)
enchimento

abreviações e pontos:
ponto baixo (pb)
pontos baixos juntos (pbj)
pontos altos juntos ( pta J)
* * repetir
red ( reduzir 1 pt)

-- antes da primeira carreira:3 correntinhas, feche, 1 correntinha.

Orelhas (x2) "A"
1) 6 pt bx
2)*2 pbj,1 pb * (9pt)
3-5) pb
6) red, 7pb (8pt)
7) red, 6pb (7pt)
8) red, 5pb (6 pt)
deixe linha suficiente para costurar


Braços (x2) "A"
1) 6pb
2) *2pbj, 2pb * (8pt)
3-5) pb (8pt)
deixe linha suficiente para costurar


Pés ( x2) "A"
deixe um pedaço longo de linha no início, pra encher os pés
1) 6pb
2) *2 pbj* ( 12 pt)
3) *2 pbj, 3pb* (15 sc)
4) *red*
deixe linha suficiente para costurar
encha com a linha do início

Cabeça/ Corpo ( comece com "A")
1) 6 pb
2) 2 pbj (12 pt)
3) * 2pbj, 1pb* (18 pt)
4) *2pbj, 2 pb* (24 pt)
5) *2pbj, 3 pb* (30 pt)
6) *2 pbj, 4 pb* (36 pt)
7-10) pb
11)* red, 4 pb* (30 pt)
12) *red, 3 pb (24 pt) - enchimento
13) *red, 2 pb* (18 pt)
14) *red, 1pb* (12pt)
--mude de cor, sem cortar a linha "A"
15) "B"*2pbj, 2pb* (16 pt)
16) *2pbj, 2 pb* repetir 5xs, 1pb no último ponto -- coloque mais enchimento se nescessário
17-21) pb (21pt)
22) 1pb, e começar o rabo, usando a linha "A", 3 pta j em relevo ( usando o 'elo da frente'), volte para linha "B" pb até o final;
23) usando os 'elos de trás' , * red , 1pb* -- coloque o enchimento do corpo
24) red até fechar


***Por favor, não use essa receita para fins comerciais. Presentear é muito bom!

terça-feira, 29 de julho de 2008

first free pattern!

mr/ms. Chubby Bunny

materials:
this pattern was originally done with a 1,75-mm hook, but any other hook size will work
the finished size with a 1.75 hook is 3 in.
i didn't use pellets, but it might be useful in bigger bunnies.
You'll need 2 yarn colors: one for head and members ("A") and a second for the body ("B"). If you decide to use only one color, just ignore the instructions for changing colors.

abbreviations and terms used:

* *_ repeat
scT_ increase
sdD_ decrease

start to work each piece using the "magic circle" or: 2 chains, 6 sc second chain from hook.
work in spirals

have fun!
.........................................

Ears (x2) "A"
1) 6 sc
2)*2 scT,sc next sc* (9sc)
3-5) sc along
6) scD, sc next 7 sc (8sc)
7) scD, sc next 6 sc (7sc)
8) scD, sc next 5 sc (6 sc)
don't stuff, finish off, leaving yarn to sew

Arms (x2) "A"
1) 6 sc
2) *2 scT, sc next 2 sc * (8sc)
3-5) sc along (8sc)
no need to stuff, F.O, leave yarn to sew

Feet ( x2) "A"
leave yarn in the beginning, to stuff the feet
1) 6sc
2) 2 scT each sc ( 12 sc)
3) *2 scT, sc next 3 sc* (15 sc)
4) scD along
stuff with the yarn from the magic circle. F.O,
leaving yarn to sew

Head/ body ( start with "A")
1) 6 sc
2) 2 scT each sc (12 sc)
3) * 2scT, sc next sc* (18 sc)
4) *2scT, sc next 2 sc* (24 sc)
5) *2scT, sc next 3 sc* (30 sc)
6) *2 scT, sc next 4 sc* (36 sc)
7-10) sc along
11)* scD, sc next 4 sc* (30 sc)
12) *scD, sc next 3 sc (24 sc) - stuff
13) *scD, sc next 2 sc* (18 sc)
14) *scD, sc next sc* (12)
--change color , without cutting "A" yarn
15) *2scT, sc next 2 sc* (16 sc)
16) *2scT, sc next 2 sc* repeat 5 times, 1 sc last sc -- add more stuffing to the head if necessary
17-21) sc along (21sc)
22) 1 sc next sc, on second sc of this round : (tail) using "A"yarn, in front loop make 3 double crochets closed tog, go back to "B" yarn, sc along.
23) back loops only, *scD, sc next sc* -- stuff body
24) scD until close


this is a free pattern, please don't use it for commercial purposes

finalmente,

um blog!
por aqui pretendo dividir algumas de minhas 'receitas' de amigurumi , minhas criaturas mais recentes ... e oque mais for possível, assim que eu realmente descobrir como isso funciona:)

bejitos,
Lara

  © Blogger template 'Morning Drink' by Ourblogtemplates.com 2008

Back to TOP